
Snowflake is a fast and easy-to-use cloud platform for managing and storing data. But like any platform, managing information access and security can be a challenge. This comprehensive guide will cover everything related to Snowflake security, including how to use Snowflake, data protection and privacy features, and best practices for managing role-based access controls.
Security in Snowflake when storing your analytical data opens a new world of possibilities for information access and protection, and it’s more important than ever to keep data security in mind.
What Is the Snowflake Platform?
Snowflake is a database platform like Microsoft SQL Server or Oracle that is purpose-built from scratch for the cloud. Its developers kept familiar concepts (tables, views, SQL queries) but threw out all assumptions about how databases traditionally work and embraced everything cloud computing offers.
Snowflake’s underlying architecture makes it easy to provide high-performance data access to any number of internal and external users with far more efficiency than traditional databases. Organizations can extract enormous value from the data they collect in Snowflake if they can keep it organized and accessible while not allowing sensitive information to escape.
This complete guide to Snowflake will propose a set of technology, architecture, and process standards to support these goals while balancing cost, maintainability, and performance.
Here’s what we’ll cover in this guide:
Snowflake Security vs. Privacy
Why Does Data Privacy and Security in Snowflake Matter?
How to Identify, Organize and Isolate Data in Snowflake
Snowflake Security Features and Privacy Controls
Row Access Policies in Snowflake
Use Snowflake Roles to Determine Access Controls
How Regulating Internal Data Protects Your Reputation
Your Data Is No Good Locked Up
Snowflake Security vs. Privacy
Data security refers to protecting data from outside access or interference (essentially blocking hackers). In Snowflake, all data is encrypted while in motion and while at rest, protecting it from direct outside theft. If desired, special Snowflake accounts are available for federal government work and Health Insurance Portability and Accountability Act (HIPAA) compliance, but even the standard Snowflake environment is highly secure.
A well-configured, secure Snowflake environment that uses tools like Active Directory integration and single sign-on (SSO) will not allow any direct access from outside your organization. Employees will be able to log in from within your network. However, external users will access data only through interfaces you create or provide, such as dashboards or applications (or tightly controlled data shares, if desired). Employees using SSO authentication against their Active Directory accounts will automatically lose access if they leave the organization.
Moreover, organizations enforce network policies to restrict access. This ensures that only authorized users can log in to the Snowflake instance from approved networks and devices. Security is further strengthened through multiple measures, including:
- Multifactor Authentication (MFA): Add an essential layer of verification to protect accounts against unauthorized access even if passwords are compromised.
- Password Policies: Enforce strong password creation rules, expiration timelines, and reuse restrictions to enhance account security.
- Key Pair Authentication: Ensure secure, credentialless authentication using private and public key pairs for system-level access.
- Session Timeout Policies: Automatically log out inactive users to reduce the risk of unauthorized access.
Of greater concern is the proper protection of data privacy within the world of authorized Snowflake users.
Why Does Data Privacy and Security in Snowflake Matter?
Information is simultaneously valuable and dangerous. Organizations can extract enormous value from the information they collect if they can keep it organized and accessible.
However, we all know the names of organizations that have allowed sensitive information to escape. New privacy and reporting regulations emerge every day at state, federal, and international levels. Moreover, there’s an enormous reputational risk of a loss of trust from consumers and business partners.
To get the most out of the platform, organizations need a Snowflake implementation plan that:
- Keeps sensitive data secure not only from unauthorized external access (e.g., hacking) but also from any internal access — even accidental — that does not have a specific, authorized, legitimate business purpose.
- Isolates data owned by different entities so that companies can correlate it for legitimate business purposes but makes it effectively impossible to inappropriately or inadvertently combine this data. Maybe you want to share trends or benchmarks across customers but ensure they can never access each other’s data.
- Identifies data elements in support of these goals and provides a clear understanding and consistent meaning while slicing and dicing information.
- Tracks the sources and movements of data elements in support of:
- Identification
- Auditing
- Compliance
- Accuracy
How to Identify, Organize, and Isolate Data in Snowflake
The ability to identify the data at hand across several dimensions is essential to any data privacy and management exercise. You should know which data is sensitive and private (and where such data is stored), where it came from, who owns it, and frankly, as much as possible about how to apply it to different purposes — some of which might not be known yet.
Physical and Logical Model
Data is typically stored in a nested series of structures, each smaller (in terms of volume and complexity) than the last, each giving more detail and specificity. In a traditional database, this might look like:
Server -> Database -> Schema -> Table -> Column / Row (which together define a single element).
If you do not have access to the server, you cannot access any of the tables or data within. This provides a rudimentary path to information security but generally leads to an all-or-nothing approach unsuitable to today’s goals.
This was largely forced upon users in a traditional database environment:
- A single database was dependent on its hardware (server) and could only hold and process so much information.
- Databases were separated by subject area, and querying across them was very slow, if not impossible.
- Granting access to an entire database and all its contents was easy. Granting access to only specific subsets of data was hard.
- A lack of metadata made this hard enough to be unfeasible in most cases. You could restrict access to columns holding private data (e.g., SSN), but you had to find and restrict each one on a case-by-case basis. It was much safer and easier to simply restrict access to the entire database.
Cloud-native tools like Snowflake eliminate the server paradigm and treat databases as logical containers so you can choose an organizational structure that better suits your security and usage patterns.
Snowflake also enforces a security-first model. That makes it effectively impossible to grant access to an entire database and all its contents in a single step unless you have specifically and intentionally designed your model to support that from the beginning.
Data Isolation
The first and strongest line of defense for keeping data private is isolation — keeping your valuables, like jewelry, in a safe deposit box at a bank prevents them from getting stolen from your house in a burglary.
However, isolation comes at a cost — you can’t easily use your jewelry, for example, if it’s in a safe deposit box.
Snowflake is a highly secure environment that provides multiple layers of isolation you can use for appropriate data access, much like a bank that has a drive-up, an ATM lobby, a main lobby, a vault, and so forth.

Organization (Optional)
No data is stored at the organization level. This concept simply provides control and administration of multiple accounts. A single organizational administrator can manage all your separate accounts in a single location, including use and budgeting. An organization does not need to be set up at all if you’ll only be using a single account, but it’s good future-proofing practice if you may need to manage multiple accounts later.
Account
Snowflake stores all the data for a single account across distributed commodity storage in a single public-cloud provider region, such as Azure/North Central U.S. This storage is effectively unlimited and doesn’t depend on any one server or hard drive. It’s the same underlying storage used for services like Netflix.
You can copy data from a single account across regions and clouds to other accounts within your organization, but you cannot query seamlessly between them. Each account is tied to a cloud region, making this the ideal level of separation to comply with regulations such as the European Union’s General Data Protection Regulation (GDPR) and India’s on-soil requirements. You can choose to physically store all data relating to customers from a given country in a single account hosted in that country.
If you have a legitimate need to share some of that data across borders, you can easily make backup copies into other accounts or set up internal data shares to expose tightly controlled subsets of data between accounts.
Database
Snowflake organizes and optimizes data for querying during the loading process, and you’ll get better performance if related data is in a single database within your account. Snowflake has seen individual customer databases run over four petabytes, so if you organize your data well, you have minimal limitations. Unlike traditional database servers, however, you can seamlessly query across databases within an account with nearly the same performance as in a single database.
You can use this fact as part of your organizational structure by supporting isolation and Snowflake security while also allowing limited cross-cutting operations. For example, you can segregate private data into one database while keeping the generally accessible halves of those records in another. Most people can only access the public database, but you can allow certain people to retrieve combined public/private data with a query like:

Schema
A schema is a virtual structure within a database used for further organization — essentially, a folder for related tables. At this level, performance doesn’t vary, so you can use this however you like to keep things organized and secure.
A tagging or security schema, for example, can centralize all the tags and Snowflake security rules you want to use throughout your database, allowing only administrators to maintain them. This can also be useful if you want to give someone the ability to create their own tables in a segregated schema while using — but not editing — the shared tables in the main schema.
Table
Like any traditional database, Snowflake stores the actual data for a specific topic at a single grain (e.g., employee) in a table in rows and columns. This is the lowest level for standard Snowflake security. Users receive access to a database, to a schema within the database, and to specific tables within the schema.
Unlike traditional database tools, granting a user access to a database or schema does not grant them access to any of the tables within — you must be specific. However, without taking further steps, once a user receives access to a table, they can see all the data in that table.
Data Share
Data shares are one of the unique benefits of Snowflake’s underlying storage model. Put simply, Snowflake’s data is stored and versioned completely separately from how it is accessed (separation of storage and compute). This means if you want, you can create a “share” that appears as a read-only database to another Snowflake user inside or outside your organization.
You can grant access to as much or as little data as you’d like, with just as much control and filtering as any other role, without giving that user any access to your Snowflake environment or copying any data. Snowflake extends this idea to support a data marketplace in which you can sell access to valuable information you collect, but that is beyond the scope of this post.
Additionally, Snowflake enhances data sharing with private listings, enabling secure sharing across regions and clouds while maintaining governance controls.
What’s important to note here is that all the features discussed in this guide apply equally to data shares as they do to any other database or table.
Snowflake Security Features and Privacy Controls
Before we dive into using specific Snowflake security features, let’s first review a couple of key concepts that drive our decisions.
Key Security Concepts
Grain and Granularity
Grain refers to the amount of detail that exists in the data itself as stored. A table with each individual sales transaction is very granular, or fine-grained. A table with total spending per customer per month is less granular, and a table with total purchases per month across all customers by country is an even broader grain.
Data granularity is a key nuance to consider when planning your security model. It is easy to say finance analysts at your company should not have access to credit card transaction data, but you really mean they shouldn’t have access to it at the individual customer level. If you roll it up by month across all customers or by category, it may still be proprietary to your company, but it’s no longer private in the same sense.
Even ignoring the security ramifications, it’s important to remember data granularity when correlating information from different sources and for different purposes.
For example, the data you have may not be fine-grained enough: Individual sales transaction data is very fine-grained but may not give the information needed for detailed product performance analysis. For that, you might want access to each individual item purchased, not only the order information.
Obviously, the finer-grained the data, the more of it there is — the more it costs to store and the slower it is to query.
However, modern cloud platforms like Snowflake make it more affordable to store large amounts of data and query it with vastly better performance, assuming it is organized properly. With the added ability to isolate, aggregate, tag, and secure information, the industry’s best practices have evolved to collect and store all available data at the finest possible grain, so you have it when you need it.
Retention
This “grab everything” bias must also acknowledge legal, regulatory, and ethical practices regarding collection and retention of data. Granular data that may be useful in the future may also be too “expensive” to collect and hold from a legal or ethical point of view.
Ideally, organizations would follow these Snowflake data security management rules:
- Exclude sensitive data entirely where you can’t imagine a valid and allowable analytical use for it.
-
- Example: A Social Security number (SSN) has no analytical value. You should collect it only when necessary for business operational purposes, exclude it from all analytical platforms, and permanently delete it when and where possible.
- Isolate, de-identify, and secure sensitive data that does have an acceptable analytical purpose.
-
- Example: Birth year can help identify usage patterns across cohorts. If you separate it from the person’s identifying info (e.g., name and address) and expose only the year portion to those who need it for analysis, keeping granular birth-year data may become valuable and acceptable.
- Subject to the above limitations, collect and keep original, raw, granular data as well as cleaned and aggregated data to:
-
- Prove the validity of cleaned and aggregated data
- Support audit requirements
- Reprocess, reclean, and reaggregate data when needs and rules change
- Expose the aggregated versions only unless and until a user needs the details.
- Default to least-privilege. Only grant access to the specific data needed for a given purpose and just in time (retrieve item details only when and where needed to conduct a detailed analysis).
- Make policies and procedures governing data access and usage clear, including the context, to allow independent judgment of new scenarios.
-
- Example: A ZIP code is not sensitive or personally identifiable, but it is highly correlated to race in the U.S. You don’t necessarily need to control access to ZIP code, but you do need to control use.
- And don’t make avoidable errors. Enforce granular security and access controls, and you can collect and store granular data responsibly.
Snowflake Security Features for Granular Control
Let’s explore a few Snowflake security features to consider when planning for granular control:
Views
The simplest approach is to create a view that acts as a lens or filter on a given table.
(Note: In traditional databases, views could cause performance problems, especially when combined. This is much less of a concern in Snowflake because the platform encourages views).
If you create a view that shows everything from the employee table except for private fields and remove all access to the underlying table, your private columns are secure. By itself, this approach can be inflexible. If different people need different access, you may need to create one view that hides all sensitive columns, another that hides all except for birth date, and so on. However, you can avoid this issue by combining the other tools below.
Variations
With a standard view, tech-savvy users might glean some limited information about the underlying tables (such as column names) by looking at the performance plan. If you need to completely prevent this, Snowflake lets you create a secure view, which obscures all information about the underlying tables. However, there is a performance trade-off because Snowflake can no longer optimize for the underlying table structures either.
If query performance on a live view becomes an issue, you can create a materialized view (MV), which runs the query but stores a copy of the results as if it were a table. This can conflict with some of the advanced security concepts that follow, but you can avoid this conflict by choosing a consistent pattern.
However, MVs have a limitation. They can reference only a single underlying table, which can restrict use cases involving complex joins across multiple tables.
To address this limitation, Snowflake introduced dynamic tables, which store results similar to MVs but support queries involving multiple tables in joins. Dynamic tables, however, require additional consideration and configuration, making them a topic of separate discussion.
Columns: Dynamic Data Masking
Snowflake’s security model lets you apply policies that mask the data in a given column depending on the specific permissions of the user querying it. You can create a policy such that the query “SELECT SSN FROM Employee” will return:
- ###-##-#### for most users
- ###-##-6789 for members of the HR role
- 123-45-6789 for members of the payroll role
This masking can be whatever you’d like, including just a blank result. You can apply column masking policies directly to selected columns in tables or views, and it doesn’t alter the underlying data in any way. Note you must apply masking policies on a column-by-column basis. You can add these to any or all columns at the time you create a table or view, or you can add them later.
Conditional data masking takes this a step further by enabling dynamic masking based on the values in other columns. This allows you to selectively mask data by evaluating whether specific conditions are met, offering more granular control over data protection. This powerful feature ensures context-aware access control, making your security measures even more adaptable to complex business rules.
Rows: Row Access Policies
Similarly, you can apply a policy to filter the rows that are returned from a query. This is different from a column policy in that:
- There is no masking — the affected rows are simply not returned.
- You do not choose specific rows (as you do with columns). You create a filtering rule that is applied based on the contents of each row.
More details about this will come later in the guide, but in short, given a sales transaction table with a “MerchantID” column, you can create a policy such that “SELECT * FROM transactions” will only return rows where the MerchantID in the row = the MerchantID of the user. As above, you can directly apply this to a table or a view. If needed, you can even nest them: You can apply a filtering rule on a table and another rule on specific views that further filter the data from the underlying table.
Note: All the above features apply equally and automatically to data shares. If you choose to create a share with access to some of your tables or views, any masking or row access policies carry forward invisibly, ensuring there is no possibility of data leakage.
The goal of these Snowflake security features is to control access to data with almost surgical precision without making bespoke copies — which means without the development or maintenance headaches of data feeds and without worrying about inconsistent or out-of-date information.
Trust Center
Snowflake has introduced another layer of governance on security scrutiny called Trust Center.
The Trust Center helps you assess and monitor your Snowflake account for potential security risks. It evaluates your account against recommended security practices through scheduled scans, with customizable scan frequencies. If any security recommendations are violated, the Trust Center provides a detailed list of risks along with guidance on mitigating them.
Common use cases of Trust Center include:
- Enforcing multifactor authentication for all users with password-based logins
- Identifying and addressing over-privileged roles
- Limiting the number of users assigned to ACCOUNTADMIN and SECURITYADMIN roles
- Detecting inactive users who haven’t logged in for over 90 days
- Identifying and mitigating risks associated with high-risk user accounts and authentication vulnerabilities
Using Tags in Snowflake
Tags are another tool you can use to boost your data’s security in Snowflake. Let’s explore object tagging and how you can use it for Snowflake data governance.
Data vs. Metadata in Snowflake
First, you need to know the difference between data and metadata in Snowflake.
Data is the information itself — date, amount, product, customer, and so on. Metadata is information about the data.
For example, you know that this nine-digit number (your data) is a Social Security number (your metadata). Historically, you had to rely on a combination of naming conventions and human judgment to glean the metadata about your data, hoping the table is called something like “employee” and the relevant column has a name like “social_security_number,” or look for patterns like “123-45-6789.”
Now, you can tag tables and columns directly. This makes it easy to keep track of important fields and control access to them.
What Are Tags in Snowflake?
Typical databases, feeds, and files hold only data with minimal metadata (e.g., column names).
However, Snowflake provides the opportunity to store much more metadata in the form of tags. Snowflake offers the ability to create and apply tags to databases, schemas, tables, views, and columns (and also to users and roles).
Tags are made of key-value pairs. For example, “cost_center = finance” or “protection_level = PII” or “PII_type = email”.
Equally as important, you can set up multiple tags and apply them to the same piece of data: “personally-identifiable: true; sensitive: true; type: SSN; category: employee, owner: HR” and so on. These tags can be anything you like and, therefore, require careful management to be useful.
Further, tags are inherited based on where you apply them. So if you tag a table “protection_level = private,” every column in that table will also be tagged as “protection_level = private”. This applies the same way at higher levels: If you tag an entire database as “protection_level = private,” then every schema, every table, every view, and every column in that database will be tagged as “protection_level = private”.
This requires careful management but is ultimately very useful. If you write a query that brings back columns from multiple places, each column pulled from anywhere in the private database will carry the “protection_level = private” tag in Snowflake’s tagging repository.
You can also override or add to tags. A specific table in the “cost_center = finance” schema may have its tag overridden to “cost_center = finance_north_america”. All the columns in a table with “protection_level = PII” will have the same “protection_level = PII” tag but can also have a specific tag such as “PII_type = email” appended. That way, both pieces of information are returned when you query information about that column.
Important note: Many different tags can be applied to the same table or column, but you cannot set multiple values for the same tag on the same column. You need to plan and organize tags carefully in situations where multiple pieces of similar information may apply. For example, you cannot combine “protection_level = PII” and “protection_level = GDPR” but you can combine “PII = true” and “GDPR = true”.
Combining Tagging and Masking
The dynamic data masking feature lets you hide the contents of sensitive fields from people without access. You can use tagging to support and improve masking efforts. Snowflake has not yet implemented a fully dynamic combination of tagging and masking: You must set dynamic data masking explicitly on each column, and the masking rule cannot simply look up and use that column’s tags.
However, you can still use this information to drive your masking implementation and audit for completeness. You can query Snowflake to find out all tagged columns that should be masked per your rules, query to find out which ones are or are not masked, and apply masking where it’s missing. You can also query Snowflake’s history tables to see who accessed tagged tables or columns and when.
Combining tagging capability with dynamic data masking, you can create and enforce a hierarchy of permissions:
Database Tag: “owner = HR”
Schema Tag: “category = employee_data”
Table Tag: “protection_level = PII”
Column Tags: “PII_type = firstname,” “PII_type = lastname,” “PII_type = work_email,”
“PII_type = work_phone,” “PII_type = personal_phone,” “PII_type = dob,” and “PII_type = ssn”
You can keep this simple by using tags to inform your masking requirements. Or you can write a slightly more complicated masking policy that reads from the SYSTEM$GET_TAG function to enforce masking based directly on the tags in place.
This isn’t completely dynamic. You need to code for the specific tag and column combinations you want to check. But it does make your code more self-documenting and secure.
Since processing this lookup logic will take some computing resources, you’ll want to do a proof of concept to make sure your specific implementation still performs well if you go this route.
Given a masking implementation using the example tags above, if any user in your company who has not been granted access to the “employee_data” tag happens to find the employee table and tries to query it, they’ll get:

An HR user within your company who has been granted access to the “protection_level = PII” tag and to some specific “PII_type” tags will get:

Tag Management
Because tags are so flexible, you must guard against proliferation and inconsistency. The best practice is to create a separate security database that holds all security-related information. Within that, create a “Tag_Library” schema where you can define and manage all tags in a central location. Specific roles are recommended for:
- Tag_Administrator: A person who is allowed to create brand-new tags (such as “owner” or “PII_type”)
- Tag_Steward: A person who is allowed to add new values for an existing tag (such as “work_email” or “personal_phone” as new “PII_types”)
- Tag_Manager: A person (or program) who can apply tags to databases, schemas, and other objects
During the process of loading data into a new Snowflake table, Snowflake can look for patterns like “(###) ###-####” and apply best-guess tags to columns. This is a nascent capability, however, so you need to have your own approach to review and augment any automatic tags.
Snowflake also offers the ability to monitor and audit tag usage:
- The snowflake.account_usage.tags view shows all tags that have been created.
- The snowflake.account_usage.tag_references function shows all the places each tag has been applied (each database, schema, view, table, column). You can call this with a filter to zero in on a specific object as desired.
- The snowflake.account_usage.tag_references_with_lineage function includes not only what tags exist on an object but how they got there (e.g., column-level tags inherited from the table, which are inherited from the database).
Snowflake’s data classification and auto-tagging capabilities mark a transformative step in modern data governance. These features enable organizations to efficiently identify, manage, and protect sensitive data, significantly enhancing compliance efforts while improving data accessibility and visibility. Key benefits include:
- Automated Detection: Identify columns containing personal or sensitive data within vast datasets.
- Semantic and Privacy Tagging: Apply predefined Snowflake system tags that categorize data based on its sensitivity or privacy requirements.
- Policy-Driven Access Control: Dynamically assign data access policies to columns using system tags, ensuring that sensitive information is protected according to compliance regulations.
- Audit and Monitoring: Efficiently track and audit personal data across millions of columns, providing clear insights into sensitive data distribution and security.
Some data cataloging and lineage tools can make use of these tags. The Alation and OneTrust data catalogs are the first tools explicitly supporting Snowflake tags, but many others are expected. Using a tool like this, you can pull descriptions and locations of all your tagged data into a data catalog. This makes it easy to see where all instances of personally identifiable information (PII), for example, are stored and how people are using them.
Tag Limitations
Tags are meant for big-picture information about an entire table or column — metadata that describes the contents and can be used for limited enforcement. However, you cannot apply tags to specific data inside a table itself (e.g., you cannot tag certain rows in a table as belonging to Customer 1 or Customer 2. Not to worry — you can handle this level of filtering using row access control.
Why Do Snowflake Tags Matter?
Remember, the first step in keeping your data private and secure is identifying which data needs protection. Traditional data catalogs and governance processes have to make do with educated guesses about your data, and it is hard to keep them in sync with reality.
But with built-in data tags, you can keep track of important information right at the source, provide it to all your data consumers, and use it to ensure you’re properly protecting your most sensitive assets.
Row Access Policies for Snowflake Security
Row access policies is another powerful Snowflake data security feature. With row access, you can restrict access to specific rows within a table. Let’s follow along with a specific example to show exactly how to put these policies in place.
Snowflake Row-Level Security
Combining the storage hierarchy, flexibility, and security policies described so far in this guide, it is quite easy to limit access to data at a highly granular level in Snowflake. For simple restrictions, separate data and use custom views.
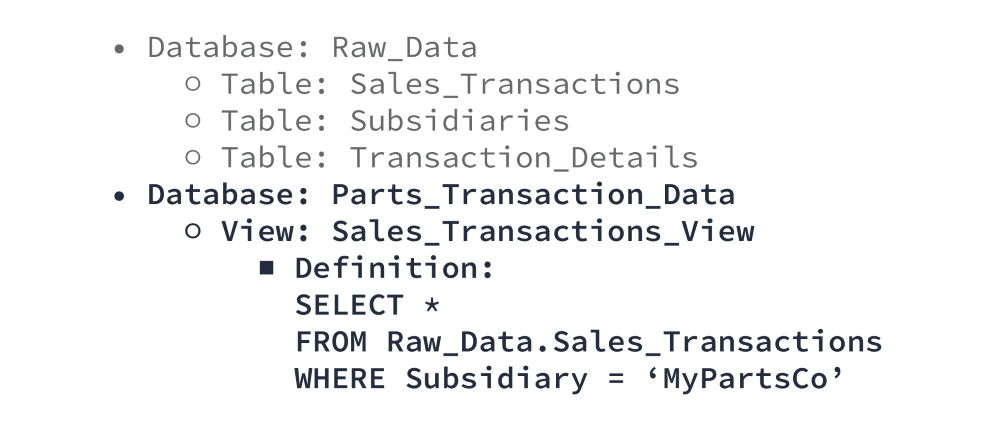
In this scenario, no one from MyPartsCo has any access to the “Raw_Data” database — they cannot even see it exists. They can only see the “Parts_Transaction_Data” database. When they query the “Sales_Transactions_View,” they see what appears to be the “Sales_Transactions” table, but only the rows containing MyPartsCo data. Unless explicitly granted access to the other database, it is impossible for them to see anything else.
For more complex restrictions, you can use Snowflake’s row access policies.
Much like tags, you can create row access policies once and apply them in multiple locations. A row access policy can use the data present in the table, information about the table itself (e.g., tags), information about the current context (who is asking and what role they have), or information it looks up from somewhere else (a mapping table that associates a user to a region) in any combination.
Example table:
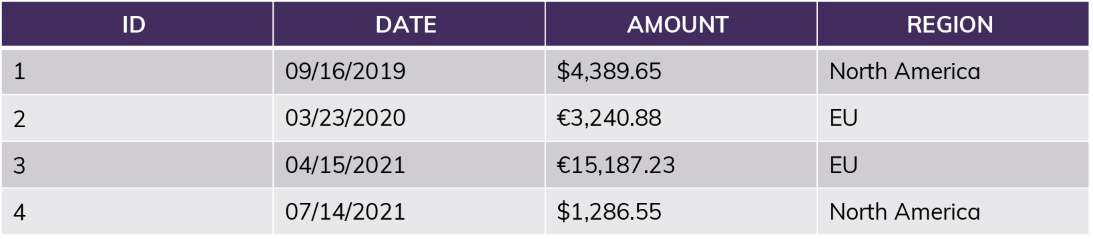
The simplest policy looks at a single attribute: “current_user = Jane?” If yes, all rows are returned. If no, none are returned.
More realistically, you might compare the current user’s “role” (or the group they belong to) combined with information in the table itself: “current_role = [Region]?”
If the user is in the role “NorthAmerica,” no matter what query they run, the results will only include information from rows 1 and 4. This includes queries like “SUM(Amount)” — the sum will not include the EU amounts. For this user, rows 2 and 3 do not exist.

For something like region access, you would extend this further using a mapping table to tell you who should have access to which region rather than relying on named roles matching regions.

The row access policy can quickly look up the user in the mapping table above, take note of special circumstances like “All,” and apply filtering from there. You can apply this single lookup function to as many tables and views as you would like.
Finally, you can combine and stack policies with other tools.
Example table:

Example view (“WHERE Subsidiary = MyPartsCo”):

After applying the row access policy “current_role = [Region]?” to the view:

Now let’s imagine you also applied a masking policy to the original table (not the MyPartsCo view) based on whether the specific user is allowed to see financial data:

How to Establish Snowflake Row Access Policies for Better Security
There are a few points to keep in mind when setting up row access policies in Snowflake. Let’s continue with the example:
- You must define all policies with a “default-nothing” result in mind. If you define a rule as “where Subsidiary is not ProductsCo,” then that will return MyPartsCo records, but it will also return records where the brand is blank, unknown, or misspelled, which could accidentally include ProductsCo records. If you define the rule as “where Subsidiary is MyPartsCo,” then your default position — anything else, including unknown — is “you see nothing.”
- Since there can be performance impacts based on where and how you apply these policies, and since there are multiple tools at your disposal, you’ll need to consider the most effective and efficient approach. For example, putting a row access policy on the underlying data table might be the most secure since no derived views can possibly circumvent that rule, but it will impact every query on that table (including technical operations like loading data). If you can isolate access at a high level first (e.g., through views), you can reduce the performance impact while remaining secure.
- You can combine row access and data masking policies on the same table, but you cannot use a masked column to drive a row access policy. For example, you cannot use a region column to filter a table if you have also masked that same region column so certain people cannot see it.
Row access policies, especially when combined with dynamic data masking, alleviate the headaches previously associated with managing access to sensitive data. This opens the door to sharing your “single version of the truth” wherever it’s needed within an organization (or even outside through data shares) without worrying about inadvertent access to sensitive information.
Use Snowflake Roles to Determine Access Controls
A role in Snowflake controls not only what data a given user can see but also what they can do, which in turn impacts performance and cost.
In traditional databases, giving someone access to a database server gives them access to both the data on that server and access to use its CPU and RAM to run queries. One of Snowflake’s key features is that it treats storage and compute separately. You can give both finance and data science users access to the same storage — the same data.
But you can also give finance access to a standard compute engine to run reports while giving data scientists access to an extra-large compute engine to run complex analysis or machine-learning algorithms.
Both compute engines can operate simultaneously and query the same data without any impact on each other whatsoever — the data science routines do not slow down or interfere with the finance reports.
Snowflake calls these sets of compute power “warehouses,” which is a bit confusing. A warehouse, in this context, simply refers to a set of distributed CPU and RAM — a set of virtual machines — and does not involve any data. If you want to let finance query some data, you first have to give them access to the data itself and also give them access to a warehouse (CPU and RAM) that allows them to work on that data.
Like most cloud data platforms, Snowflake charges very little for storage and primarily charges based on how much compute power you use. Separate compute allows you to isolate workloads, track usage, and (if appropriate) charge back to the right department.
For this reason, as well as the security considerations described above, you should define a role based on a common set of activities, responsibilities, and behaviors, not solely on a set of permissions.
Snowflake Roles in Practice
For example, if you create a Snowflake role called “Prod_Read_Only,” that could describe a wide variety of people with very different responsibilities. It also makes maintenance difficult. You have to add and remove specific people from a whole variety of “roles” (Prod_Read_Only, Dev_Read_Write, UAT_Read_Write) as their needs change.
Further, it only describes their data access. What if you want both finance and data scientists to have “Prod_Read_Only” access but want them to use different warehouses?
Roles should instead be specific to their real-world position. “Data_Developer,” “Application_Developer,” “Data_Tester,” “Finance_Analyst,” “Fraud_Analyst,” “Broker,” “Supplier” and so on. All have a need to access different but overlapping datasets in different ways. Even non-human roles exist, such as “Data_Loader” or “Data_Monitor” for automated routines.
After you define your roles, it’s relatively easy to define and maintain their access to both processing power and data, including all the granular security options we’ve discussed in this guide. For example, your role descriptions might look like this:
Data Developer:
- Read/write access to dev sales data
- Read/write access to user acceptance testing (UAT) sales data
- Read access to prod sales data
- Usage access to a medium-powered warehouse for loading and querying in any environment
- Masking applied to all PII and sensitive brand data in all environments
Application Tester:
- Read access to dev sales data
- Read access to UAT sales data
- Read access to prod sales data
- Usage access on a small warehouse for basic querying anywhere
- Masking applied to all PII but not sensitive subsidiary data since they need to be able to test all of it
Data Monitor (Non-Human):
- Read access to all data in all environments
- Usage access on a large warehouse for frequent, efficient checks of large amounts of information
- No masking applied so it can identify discrepancies even in sensitive fields
Several roles may have the same permissions. This is fine and not wasted effort: At any moment, it may make sense to remove prod read access from the data testers but keep it for the application testers, at which point you’ll be happy you kept them separate. At the same time, perhaps you’ll have all those development roles share a single warehouse until conflicting needs demand a second warehouse.
Snowflake roles can easily be inherited, and their permissions can be mixed and matched as needed. Consider a hierarchy like this:
- Finance Analyst [global]
- Finance-US
- Finance-USEast
- Finance-USMidwest
- Finance-USWest
- Finance-EU
- Finance-France
- Finance-Germany
- (And so on)
In this example, perhaps all members of the “Finance_Analyst” role have access to sensitive financial columns (unmasked), but none have access to PII columns. Members of Finance-US can see U.S. rows, and all U.S. finance analysts share a single medium-powered warehouse for querying. Members of individual U.S. regions have further row filtering but still share the same warehouse with all their U.S. colleagues.
Inheritance also makes it easy to manage temporary access. Perhaps the data support team, who cannot normally see prod data, needs temporary read access in prod to investigate a mismatch in sensitive data alerted by the data monitor role. You can temporarily add one person — or the entire role — under “Data_Monitor” and inherit all its access while they investigate the problem. Then, when they finish investigating, you can remove them in a single step.
How to Move Forward With Snowflake Roles
Because there are so many available methods for securing data, you need to strike the right balance between security, performance, and ease of maintenance.
Managing access through Snowflake roles is slightly more bulletproof than managing access by mapping tables. There is a slightly lower risk of making a mistake in configuration with roles, but roles are noticeably harder to maintain in large quantities.
An appropriate plan for your organization will depend on how many regions, roles, internal and external users, and databases you’re likely to have, along with decisions about automated provisioning and keeping these roles in sync with other parts of your organization (e.g., Active Directory).
Here are a few guidelines to help you implement roles and other access control tools efficiently:
- Resort to separate roles for highly sensitive security divisions (i.e., if you need to be able to prove that two organizations could never see each other’s data, this is easier to demonstrate with roles than with mapping tables).
- Use mapping tables for granular security like local-office separation. This is much easier to maintain than dozens or hundreds of roles.
- Create one role per category of user, team, or department: “Data_Developer,” “DevOps,” “Prod_Support,” “Data_Scientist,” and so on.
- Consider hierarchy by country or global region, if needed, especially for compliance with data privacy regulations, such as General Data Protection Regulation (GDPR).
- Consider performance, usage, and budgeting expectations. Remember roles are not just for data access but also delineate compute power and therefore spend between user groups.
- Avoid any roles specific to an environment (dev, prod). These make deployments, maintenance, and testing much more complicated and error-prone and can better be managed through the permissions of each role themselves.
Role management has always been an important part of data security but traditionally followed a server-by-server approach. With Snowflake’s scale and flexibility, you can reimagine roles and access to provide far better control and ease of maintenance. Taking a little time to examine your assumptions and make a plan that considers new ways of working will allow you to provide better access to data with better security and lower overhead.
How Regulating Internal Data with Snowflake Security Protects Your Reputation
Snowflake makes providing high-performance data access easier and more efficient than traditional databases, letting you extract more value from information. But it also requires organizations to think differently about keeping data safe.
Protecting Data Access and Your Reputation
Technology companies have (intentionally or unintentionally) been careless about protecting private consumer data since the rise of the internet and social media. Global governments are stepping in to hold companies accountable:
- GDPR regulations in the European Union (EU) spell out how companies must protect the data of EU citizens wherever it is stored.
- On-soil laws in countries like India and China restrict the movement of data beyond their borders.
- State regulations in Colorado and California inconsistently mimic GDPR, and similar U.S. federal laws are currently under negotiation.
- Separately, Health Insurance Portability and Accountability Act (HIPAA) regulations in the U.S. spell out exactly who may access which health-related data and under which circumstances.
Fines and related business impacts can reach tens of millions of dollars. Google, British Airways, H&M, and Marriott have each had GDPR fines over €10 million, and Equifax reached a settlement of $425 million for its 2017 data breach. In 2021, one global credit card brand had to stop issuing cards in India entirely due to alleged noncompliance with their on-soil laws.
A potentially greater concern is the damage to an organization’s reputation. In the last few years, large and profitable companies have seen their stock prices plummet when they make the news due to data breaches, and their customers leave in droves. Similar problems are simmering beneath the surface elsewhere: Medical organizations reliably comply with HIPAA regulations outside their walls but may not have the time or expertise to prevent inappropriate access by internal employees.
At many organizations, any employee has full access to private information because it’s too hard to separate by role. These practices may meet legal compliance but (as we’ve seen with the rise of phishing and ransomware) leave open opportunities for disaster.
Best Practices for Regulating Data Access in Snowflake
Here are a few recommendations for careful and efficient privacy practices inside Snowflake.
Consider anonymization, encryption, and masking.
True anonymization, per historical standards, involves transforming sensitive data to an anonymous format that cannot be reversed. In contrast, standard encryption of fields follows an unknown pattern that can be reversed with the right key, which is desirable in some cases. Anonymization physically replaces values with characters that do not in any way correspond to a pattern related to the underlying data, such as “000-000-0000” for all phone numbers.
You may not need this approach in your environment once the recommended isolation, masking, role, and row-level policies are combined.
Here are some guiding principles to follow:
- Create carefully organized roles that can be used to enforce access rules.
- For more granular Snowflake security, create mapping tables (for example, to associate people to specific regions to further limit their data access).
- Create tags for all potentially sensitive data domains and entities.
- Store and manage tags and mapping tables in an isolated security database with minimal access allowed.
- Hide data that users should not access directly in one or more isolated databases, only giving access to necessary processes.
- Create views and derived tables in another limited-access database, directing users there.
- Where feasible, also store sensitive data elements separately and allow only authorized users to connect the sensitive and nonsensitive portions.
- Apply dynamic data masking to all potentially sensitive columns using the tags above, with a default-nothing approach that masks data for all but explicitly authorized users.
- Apply row access policies to all potentially sensitive tables, again with a default-nothing approach.
If you clone data between environments, the same masking policies will be applied to anonymize production data in lower environments (e.g., for testing).
If you need further anonymization (or true irreversible anonymization), you can create and apply similar masking policies while making an automated copy of the data, resulting in an irreversibly masked derived table.
Your Data Is No Good Locked Up
Snowflake security and data privacy tools require work to implement properly, but it’s far easier than it used to be with traditional database platforms. A safety net of reliable access control means you can unlock the value of your data without putting it — or your organization — at risk.
You can empower your employees to analyze the information you have and get creative with new ways of using it. Your IT organization can be faster and more cost-effective, and your business users can be more self-sufficient. Using data shares (and even the data marketplace), you can monetize your data with low maintenance efforts and complete control.
Companies are already seeing the opportunities here: Cloud customer relationship management (CRM) vendor HubSpot was able to skip the development and maintenance of an API for their customers to retrieve data. Instead, they configured a data share and said, “Take what you need.” A major airline ticket processor opened a new revenue stream by sharing aggregated sales information with banks and market research companies.
We hope you’ll take advantage of this information to build your organization’s safety net and start to explore the possibilities that it brings.
Want more great content like this? Check out our blog.
Are you ready to move forward with a data strategy for your organization but aren’t sure where to start? Our Data and Analytics experts bring a tried-and-true approach for executing strategies into practical, pragmatic and actionable plans. Talk to an expert

