In this series of blogs, we explore the key capabilities in Office 365 and SharePoint to create business solutions, with a primary focus on PowerApps.
Instead of listing the functionalities, we help you build a PowerApp.
Part one of a series.
Even though PowerApps is still in “Preview,” it continues to evolve at a rapid pace. A recent addition to the product: the ability to create PowerApps through the browser interface. While each version brings better functionality, I thought this would be a great time to do a bit of a deeper dive into some of the technical features of the product. I could certainly list out those functionalities, and provide a description, but that is completely boring. Just building a PowerApp would be much more fun!
So, let’s jump right in with the following completely hypothetical requirements:
So, let’s say I have decided to quit technology altogether and open a chain of restaurants across the United States. I plan to offer decent food at ridiculously low prices, but also allow each restaurant to create their own menus based on a specific set of food items. However, each restaurant will use a new Menu Management PowerApp to create and submit their menus to me for approval.
SharePoint Integration
To store my data for the new Menu Management PowerApp, I’m going to leverage SharePoint lists to store the data. Why use SharePoint for this?
- My data architecture will not be overly complex.
- Since it’s a part of my Office 365 subscription, there is no additional cost. Whereas setting up a SQL Database on-prem, or in Azure/AWS would incur additional overhead.
- It’s much easier to manage than an SQL database.
- With the recently released Modern SharePoint Lists in Office 365, integration is pretty simple to set up and maintain.
So, with that, I have created a site in my SharePoint Online Tenant that will hold the lists I will use for this new PowerApp. I will initially create three lists that will house the data necessary for users to submit new menus for approval:
Menu Items
This list will contain necessary data for each Menu item that will be available for the users to select for their menu in the Menu Management PowerApp.
I have added the following columns to my custom list:
- Title– Comes by default with a custom list. Will be used to store the title of each menu item.
- Description – Multiple lines of plain text. Will store a description of each item.
- Section – Will store a value of: Appetizers, Salad, Entree, or Dessert, depending on the menu item. This was originally a choice column, but there are some limitations currently between PowerApps and SharePoint around choice columns. I’ll discuss this more in depth later on.
- Image – this will store a link to an image of each menu item. There is currently a limitation wherein PowerApps cannot display images that are hosted in SharePoint. For this example, all links will be to images hosted outside of SharePoint.
Menu Form
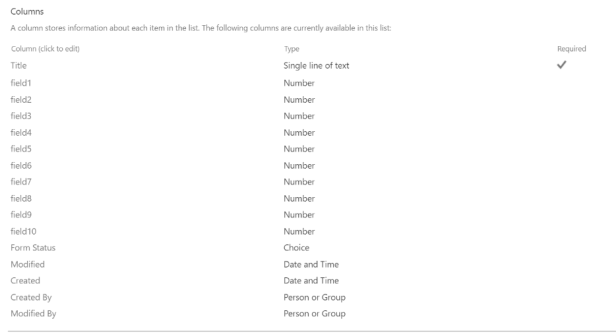
This list will contain all of the captured values from the PowerApp for the submitted menu, as well as status information on the request.
I have added the following custom items to my list:
- Title – This will be the name of the menu that is created.
- field1-field10 – These fields will hold the value of each item selected. You will notice that the type of these columns is ‘Number.’ This is because I plan to save the ‘ID’ of each menu item that is selected instead of the title. I usually prefer to use the ID, as it is always unique and easy to work with. This is just a personal preference, but it will also demonstrate some features of PowerApps as we build that functionality in.
- Form Status – This is a choice column that will be used by our back-end workflows as the menu arrangement.
I have populated these lists with some sample data as well. But enough with SharePoint for now, let’s make a PowerApp!
Create a new PowerApp
So, as I prefaced at the beginning of the article, Microsoft is now offering an additional way to create PowerApps: through a browser-based GUI. From my current experience with both tools (browser and desktop), the functionality is extremely close as far as  the admin experience goes.
The desktop client does offer more out-of-the-box templates as of today, but that will change as the browser version matures. I’m going to use the Universal App to create my PowerApp, but feel free to use whichever version you are more comfortable with, or the version that is compatible with your Operating system.
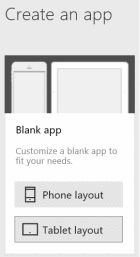
For this App, I am going to create a ‘Blank App’ with the ‘Tablet Layout’. Provides a little more real estate to help demonstrate functionality, also I use a Surface so it’s easier to see and interact with when using Touch:
Home Screen
By default, you start a new PowerApp with a blank screen called ‘Screen 1.’ Change the Screen name to ‘Home’ by clicking on the ‘Screen1’ button on the ribbon, and then renaming it to ‘Home.’
Since this will be the first screen that appears when the PowerApp is started, I’m going to add a background image, and some navigation buttons. As we add new screens, we’ll wire up each button to allow navigation to occur when clicked.
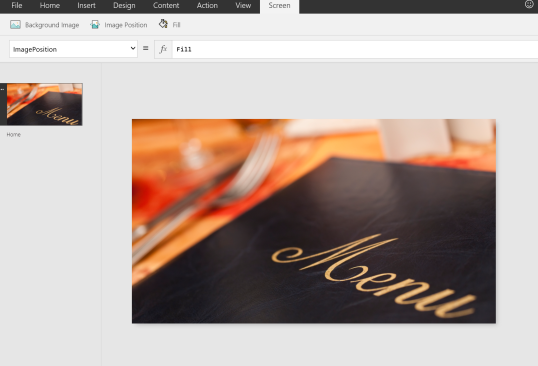
To change the background image of this screen, just click the ‘Screen’ tab at the top of the ribbon, and then click background image -> add an image file.
I chose a picture that will help give our ‘Menu Management’ some flair. Also, I changed the image position to ‘Fill’ to ensure the background covers the entire screen. (NOTE: Make sure your image files size is small and web optimized. This will help with load times.):
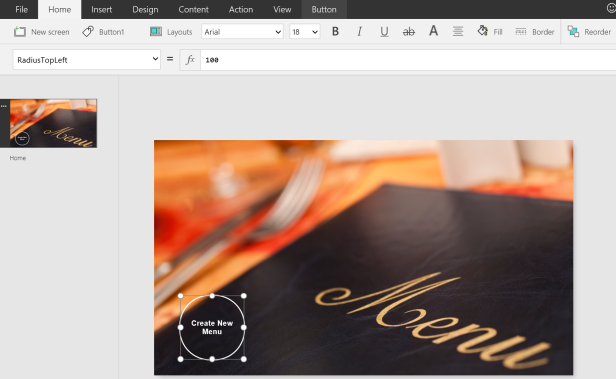
My next step will be to add a button to allow me to create a new menu. Just click on the ‘Insert’ tab, and then click on ‘Button’. You can then change the text, size, shape, font, colors, etc. Just use functions on the ‘Home’ tab, or you can manually modify each property for a more customized look:
In the case of my button, I changed the RadiusTopLeft, RadiusTopRight, RadiusBottomLeft, and RadiusBottomRight all to a value of ‘100.’ This creates a circle if you resize the button. I also set it to ‘No Fill’ and added a 3px white border. Am I a UI/UX expert? No.
But this demonstrates you can do a bit more than just the defaults.


