Are you considering migrating on-premises SharePoint deployments to Microsoft 365? You’ll want to learn about a free tool that helps you discover common pain points regarding modernization or migration to the cloud.
Anyone who has ever led a migration or upgrade from legacy versions of SharePoint can tell you the pain you experience during the process is directly related to how much discovery you do.
Simple customizations – such as customizing a page or navigation using Managed Metadata or Publishing features – as well as more complex interconnected services like Business Connectivity or third-party solutions are difficult to discover and understand. And they often do not have a simple path to migration.
I cannot stress enough how important it is to spend time in discovery before making any change within SharePoint, both on-premises and in the cloud.
Fortunately, Microsoft is always listening to its user base for the opportunity to make upgrades and changes to their products. And, in response to hearing about common struggles with discovery and migration since 2001, Microsoft has created a set of free-to-use applications to simplify the process.
In this blog, we will look at one particular instance designed for on-premises discovery, the SharePoint Migration Assessment Tool (SMAT).
Discovery with SharePoint Migration Assessment Tool
SMAT is available as a command line utility for the more recent SharePoint architecture – namely 2010 and newer. The architecture behind versions previous to these was inconsistent with the supported versions of SharePoint we have today, and therefore would require quite a bit of adaptation via STSADM and legacy PowerShell.
That’s also one reason why migration from MOSS or WSS is quite a large undertaking these days (looking your way, FAB40!). It’s best to run SMAT as the farm service account, though it can be done with other accounts with the required permissions and configuration.
The application itself, though command line focused, is quite simple to run and doesn’t require a lot of PowerShell or config file experience. Certainly, if you are comfortable with those, you can make enhancements or alterations to tweak data gathering as needed. Once downloaded, you can run the application on one of the SharePoint farm servers.
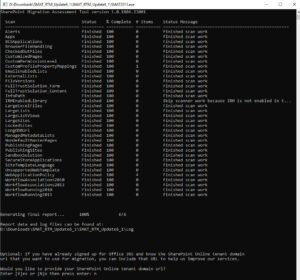
In my experience, it doesn’t require a lot of compute to run as it is designed in the typical queuing methodology Microsoft generally uses. Simply unzip the compressed files and double click the SMAT.exe. You will be presented with a window similar to the following:

As you can see, the tool will begin scanning the farm in a number of areas via a batch style collection with some items queued until others are complete.
Each task will generate a log for its particular scope. Some logs may be more useful depending on the SharePoint Farm.
Once all scans complete, close the window and browse to the location of the logs. In the root of the scan log directory, you’ll find a log titled “SummaryReport” – which is an excellent way to view the high-level issues discovered and whether they are Farm, Site or Template specific.

Once we understand our summary, we can begin digging into the various logs generated by type in the “ScannerReports” folder. I like to start with the more difficult items to discover, like workflow and BCS.
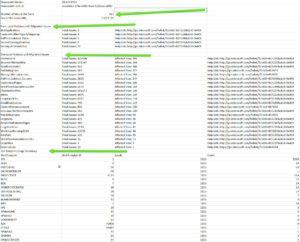
Take a look at my “WorkflowAssociations2010-detail” below:
To start, you’ll notice some very helpful information, including the web application and the site URL. We also see the owner, who may know more about the workflow itself as well as the site admins.
Now scroll to the right.
Here we can see some metrics around updates and usage as well as the scope of the workflow and list URL/Title. Scroll to the right again.
Above, we see the name of the workflow as well as if it is a globally reusable item. We even get detail on its customization.
Conclusion
You can find detailed information regarding the log files here. Each log file provides a similar view into the flagged items.
Of course, as with any automated process, there is the possibility of false positives, so it’s important to use this data as a starting point to your discovery efforts and continue to cull the data down as you flag items for migration or archive.


