As we continue our blog series, we walk through how you can use Snowflake row access policies to keep sensitive data protected.
In part one of our Snowflake security and privacy blog series, we discussed how to think about storing and organizing your data, from the organization level all the way down to individual tables.
In part two, we discussed ways to think about data access and control at a granular level. And in part three, we outlined how you can use tagging to identify sensitive data and combine it with dynamic data masking to prevent unauthorized access.
In this blog, we’ll dive into how we can restrict access to specific rows within a table using Snowflake row access policies. We’ll follow along with a specific example to show exactly how to put these policies in place.
Snowflake Row-Level Security
Combining the storage hierarchy, flexibility and security policies described in parts one to three, it is quite easy for us to limit access to data at a highly granular level. For simple restrictions, we can separate data and use custom views.
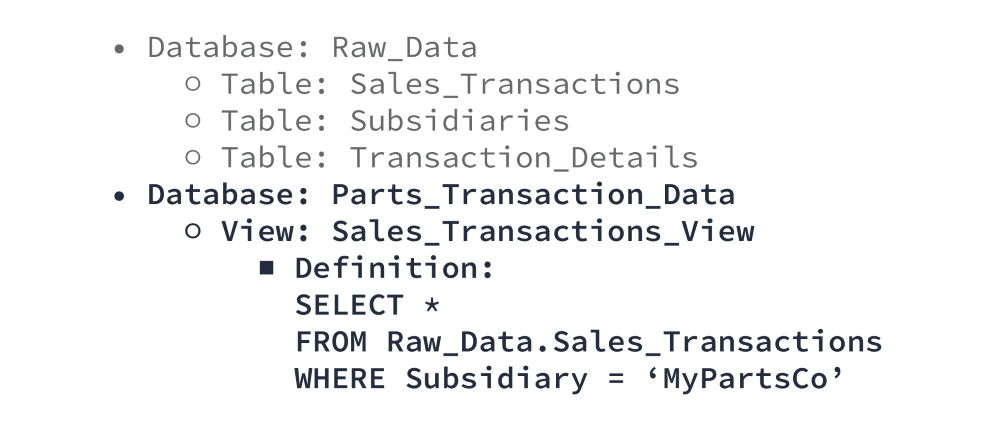
In this scenario, no one from MyPartsCo has any access to the “Raw_Data” database – they cannot even see it exists. They can only see the “Parts_Transaction_Data” database. When they query the “Sales_Transactions_View,” they see what appears to be the “Sales_Transactions” table, but only the rows containing MyPartsCo data. Unless explicitly granted access to the other database, it is impossible for them to see anything else.
For more complex restrictions, we’ll use Snowflake’s row access policies. Much like tags, you can create row access policies once and apply them in multiple locations. A row access policy can use the data present in the table, information about the table itself (e.g., tags), information about the current context (who is asking and what role they have), or information it looks up from somewhere else (a mapping table that associates a user to a region), in any combination.
Example table:
The simplest policy looks at a single attribute: “current_user = Jane?” If yes, all rows are returned. If no, none are returned.
More realistically, we might compare the current user’s “role” (or the group they belong to) combined with information in the table itself: “current_role = [Region]?”
If the user is in the role “NorthAmerica,” no matter what query they run, the results will only include information from rows 1 and 4. This includes queries like “SUM(Amount)” – the sum will not include the EU amounts. For this user, rows 2 and 3 do not exist.
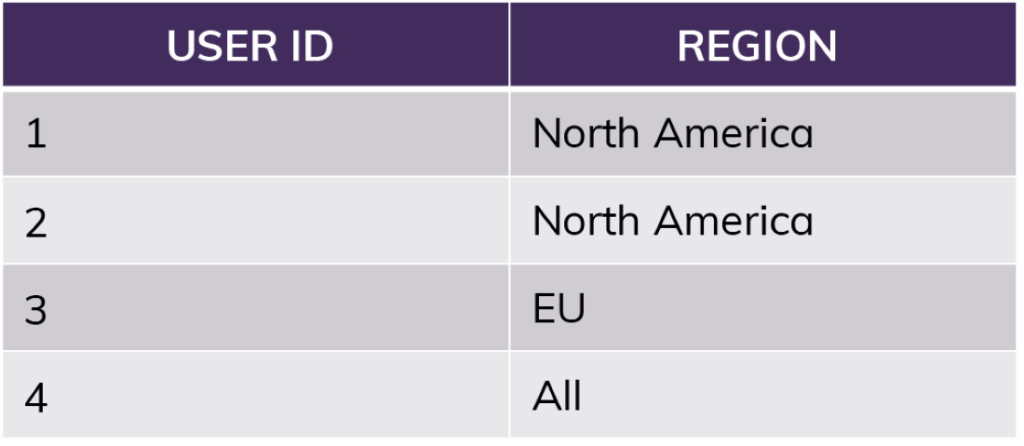
 For something like region access, we would extend this further, using a mapping table to tell us who should have access to which region rather than relying on named roles matching regions.
Our row access policy can quickly look up the user in the mapping table above, take note of special circumstances like “All,” and apply filtering from there. We can apply this single lookup function to as many tables and views as we would like.
Finally, you can combine and stack policies with other tools.
Example table:
Example view (“WHERE Subsidiary = MyPartsCo”):
After applying the row access policy “current_role = [Region]?” to the view:
Now let’s imagine we also applied a masking policy to the original table (not the MyPartsCo view), based on whether the specific user is allowed to see financial data:
Key Considerations for Establishing Snowflake Row Access Policies
Now that we walked through our scenario setting up our security policies, there are a few points to keep in mind.
- We must take care to define all policies with a “default-nothing” result in mind. If we define a rule as “where Subsidiary is not ProductsCo,” then that will return MyPartsCo records, but it will also return records where the Brand is blank, unknown or misspelled, which could accidentally include ProductsCo records. If we define our rule as “where Subsidiary is MyPartsCo,” then our default position – anything else, including unknown – is “you see nothing.”
- Since there can be performance impacts based on where and how we apply these policies, and since there are multiple tools at our disposal, we’ll need to consider the most effective and efficient approach. For example, putting a row access policy on the underlying data table might be the most secure since no derived views can possibly circumvent that rule, but it will impact every query on that table (including technical operations like loading data). If we can isolate access at a high level first (e.g., through views), we can reduce the performance impact while remaining secure.
- Note that we can combine row access and data masking policies on the same table, but we cannot use a masked column to drive a Row Access Policy. For example, we cannot use a “Region” column to filter a table if we have also masked that same “Region” column so certain people cannot see it.
Conclusion
Row access policies, especially when combined with dynamic data masking, alleviate the headaches previously associated with managing access to sensitive data. This opens the door to sharing our “single version of the truth” wherever it’s needed within our organization (or even outside, via Data Shares) without worrying about inadvertent access to sensitive information.


