
If you are leading a Google Workspace to Microsoft 365 migration, you might be confused about the order of operations for configuration. We prepared a guide to help.
If you are preparing to migrate from Google Workspace to Microsoft 365, you might be confused about the order of operations for configuration. I certainly was.
While Amazon, Microsoft and Google have agreed to work together to make this easier in the future, you might not be in a position to wait. Fear not, though, I can help.
I have a step-by-step guide for this particular type of migration, however, you may find it helpful for other migrations as well. What I detail below may or may not be required in your specific scenario, and you may also choose to do things a bit differently.
As a note: Use caution when copying and pasting PowerShell code as you would from any site. You will need to customize it some and test it.
Step-by-Step: Google Workspace to Microsoft 365 Migration
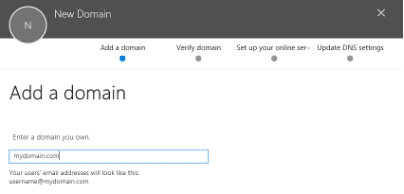
This is meant to be a helpful overview and guide on what is involved in configuring both environments. We will use mydomain.com as our verified and configured domain currently in use by Google Workspace.
Steps before you begin your migration:
1. Create a Microsoft 365 Global Admin and a Google Workspace Super Admin for use throughout this process.
2. Add your domain to Microsoft 365 and verify.
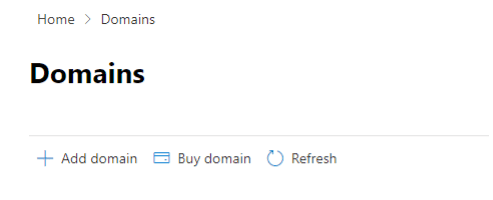
Select one of these ways to verify:
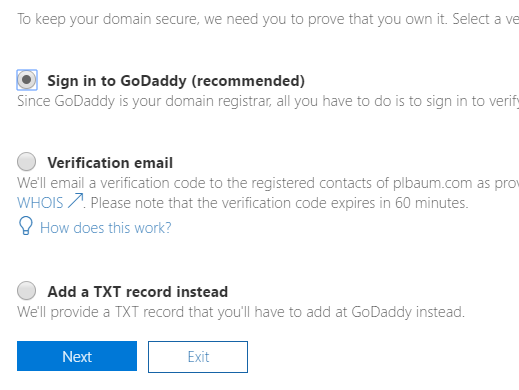
Select to add later, and then click Skip.
You may see “Setup in progress” in the domains window beside mydomain.com. This is expected and you can safely move forward.
3. Install and configure Microsoft Entra Connect on-premises or synchronize accounts with another identity manager.
4. Ensure that synchronized accounts are assigned licenses.
Use some variation of the following to assign the same license to all users.
Get-MsolUser -All –UnlicensedUsersOnly |%{Set-MsolUserLicense –UserPrincipalName $_.UserPrincipalName -AddLicenses “litwareinc:ENTERPRISEPACK”}
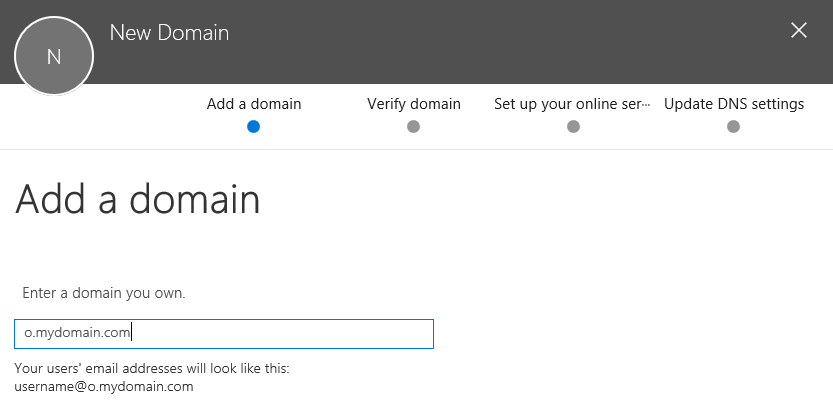
5. Add a subdomain to Microsoft 365.
This is the same process as before. MyDomain.com must be verified before adding the subdomain. The subdomain will automatically verify, or you can add a DNS TXT record at your domain registrar.
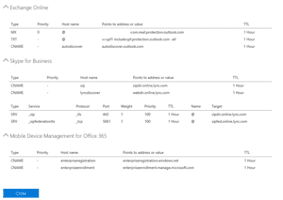
6. Add a DNS Mx record for the Microsoft 365 subdomain.
The steps to perform this will vary depending on your DNS host/registrar.
- Type: MX
- Priority: Default/0
- Host Name: o
- Points to address or value: o-mydomain-com.mail.protection.outlook.com
7. Add an AD smtp address to the proxyAddresses field.
Please note that this must be a lowercase smtp.
$Users = Get-ADUser -Filter * foreach ($user in $users ){ $alias = “smtp:” + $User.SamAccountName + “@o.mydomain.com” Set-ADUser $User.SamAccountName -Add @{‘ProxyAddresses’=$alias}
8. Add a Microsoft 365 MailContact for each Google Workspaces subdomain alias.
Two things to note here:
- Name and DisplayName use the same csv column.
- ExternalEmailAddress is the Google Workspaces subdomain, in our case, g.mydomain.com.
Import-Csv “C:path-to-csvcsv-file.csv” | ForEach {New-MailContact -Name $_.Name -DisplayName $_.Name -Firstname $_.FirstName-LastName $_.LastName -ExternalEmailAddress $_.ExternalEmailAddress}
9. Set Calendar folder permissions in migrating users’ mailboxes.
$Mailboxes = Get-Mailbox -ResultSize Unlimited ForEach ($Mailbox in $Mailboxes) {Set-MailboxFolderPermission -Identity ($Mailbox.sAMAccountName+’:Calendar’) -User Default -AccessRights LimitedDetails}
10. Turn Calendar Notifications off (recommended to not annoy users).
- For Identity column in csv file use “First Last” Name format – alternatively use DisplayName.
$names = Import-Csv “C:path-to-csvnotificationsoff.csv” ForEach ($name in $names) {Set-MailboxCalendarConfiguration $name.Identity -RemindersEnabled:$false -DefaultReminderTime:0 -ReminderSoundEnabled:$false}
11. Add a sub-domain to Google Workspaces:
- Sign in to admin.google.com and open Domains.
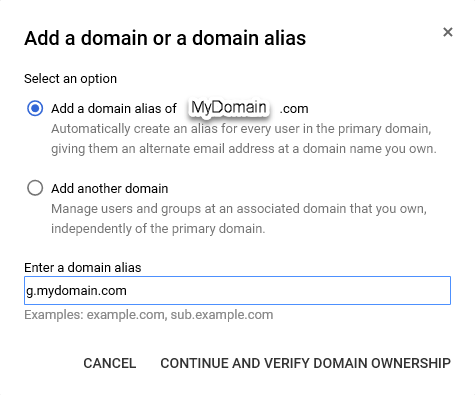
- Then click Continue and Verify if required.
12. Add Microsoft 365 subdomain to Google Workspace.
Follow the process in Step 8 above to add the o.mydomain.com subdomain to Google Workspace to support forwarding email from Google Workspace to Microsoft 365 during the migration.
13. Add a DNS Mx record for the Google Workspace subdomain.
The steps to perform this will vary depending on your DNS host/registrar.
- Type: MX
- Priority: Default/0
- Host Name: g
- Points to address or value: aspmx.l.google.com
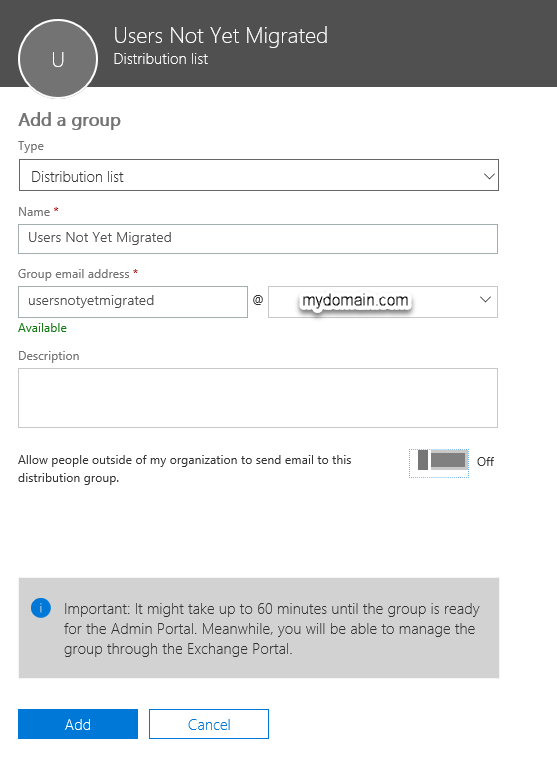
14. Create an Microsoft 365 distribution group for users not yet migrated.
15. Add all users’ G Suite email addresses to the distribution group created in Step 12.
Create a CSV file with the column heading UserPrincipalName and the addresses for the G Suite subdomain (for example, user.one@g.mydomain.com).
$users = import-csv -Path C:path-to-csvcsv-file.csv foreach ($user in $users){Add-DistributionGroupMember -Identity “Users Not Yet Migrated” -Member $user.UserPrincipalName}
16. Configure a Microsoft 365 mail connector for routing mail out of Microsoft 365 during migration.
New-OutboundConnector -Name “GSConnector” -ConnectorType OnPremises-SmartHosts “aspmx.l.google.com” -UseMXRecord $false -IsTransportRuleScoped $true
17. Configure a Microsoft 365 Mail flow rule to use the distribution group and connector.
New-TransportRule -Name “OutboundToGSuite” -SentToMemberOf “Users Not Yet Migrated” -RouteMessageOutboundConnector “GSConnector”
18. Create a new remote domain for the g.mydomain.com subdomain.
New-RemoteDomain -DomainName g.mydomain.com -Name MigrationSet-RemoteDomain -identity Migration -TNEFEnabled $true -TrustedMailInbound $true -TrustedMailOutbound $true
19. Create a Google Workspace OU with calendar disabled for migrated users.
- Go to Organizational Unit Management.
- Go to Apps Settings.
- Set calendar to OFF to avoid any duplication of calendar entries during Microsoft 365 migration.
20. Create a Microsoft 365 Availability Address space for the Google Workspace sub-domain.
Add-AvailabilityAddressSpace -ForestName g.mydomain.com -AccessMethod OrgWideFB -Credentials (Get-Credential)
21. Configure Google Workspaces Calendar Interop.
- Go to the Google App Service for Calendar.
- Scroll down to the bottom to Calendar Interop Management.
- Use the admin account you created in Step 1.
Steps to Perform Your Phased Microsoft 365 Migration
For your migration, use a tool like BitTitan to migrate users’ mail and calendar. And use a tool like Sharegate to move the Google Workspace documents to OneDrive.
22. Remove the Microsoft 365 MailContact for migrated users.
Be sure to specify the Google Workspace subdomain as the email address like: user.one@g.mydomain.com
$addresses = Import-Csv C:path-to-csvcsv-file.csv ForEach ($address in $addresses {Remove-MailContact -Identity $address-Confirm:$false}
23. Remove the Microsoft 365 user account from the distribution group for not yet migrated users.
$users = Import-csv -Path C:path-to-csvcsv-file.csv ForEach ($user in $users){Remove-DistributionGroupMember -Identity “Users Not Yet Migrated” -Member $user.UserPrincipalName Confirm:$false}
24. Move the Google Workspace user account into the calendar-disabled OU.
Consider GAM on Github as an option. It’s easy to use and works well.
25. Forward the Google Workspace user accounts’ email to the Microsoft 365 subdomain.
Google doesn’t give you anything out-of-the-box, so you’ll have to train your users to forward their own email or use a tool like BitTitan’s SDK.
26. Turn calendar notifications back on.
- For Identity column in csv file use “First Last” Name format – alternatively, use DisplayName.
$names = Import-Csv “C:path-to-csvnotificationsoff.csv” ForEach ($name in $names) {Set-MailboxCalendarConfiguration $name.Identity -RemindersEnabled:$true -DefaultReminderTime:00:15:00 -ReminderSoundEnabled:$true}
After All Users Are Migrated, Perform These Steps
27. Change the Domain Mx record for mydomain.com to the Microsoft 365 address.
The steps to perform this will vary depending on your DNS host/registrar.
- Type: MX
- Priority: Default/0
- Host Name: o
- Points to address or value: mydomain-com.mail.protection.outlook.com
28. Add the additional Domain records to point to Microsoft 365.
29. Remove the AD proxyAddresses field smtp entry from each user account.
Please note that this must be a lowercase smtp.
$Users = Get-ADUser -Filter * foreach ($user in $users ){ $alias = “smtp:” + $User.SamAccountName + “@o.mydomain.com” Set-ADUser $User.SamAccountName -Remove @{‘ProxyAddresses’=$alias}
30. Remove the Microsoft 365 distribution group from Step 8.
- Use the Microsoft 365 admin center -> Groups.
- Search for the group and open its properties.
- Click on the Delete Group button.
31. Verify all Microsoft 365 MailContacts have been removed.
32. Remove or Disable the Microsoft 365 Mail connector and Mail flow rule.
- Use the Microsoft 365 admin center -> Admin Centers -> Exchange -> Mail Flow -> Connectors.
- Highlight the connector.
- Click on the trash can icon.
33. Remove the Exchange remote domain for g.mydomain.com.
34. Remove the Microsoft 365 Availability Address space for the Google Workspace subdomain:
Remove-AvailabilityAddressSpace –Identity ga.mydomain.com
Simplifying the Migration from Google to Microsoft
Hopefully, this has been helpful for you to streamline the steps involved in the configuration and cleanup process. I definitely could have used this at the beginning to ease my stress a bit! Migrating from one platform to another is never an easy process, whether that’s because of the actual migration steps or due to the need for change management and company buy-in.
Ever feel like you’re flying solo at work? If so, Microsoft Copilot may be what you need to take the controls when the winds get rough. Download our checklist to see if your organization is ready.
